Saturday, November 24, 2012

Duck egg!

I'm super happy about this little table! I had seen this beautiful color in my friends house, on piece of furniture she had painted, and just couldn't take my eyes off of it. The paint she used was duck egg blue chalk paint.

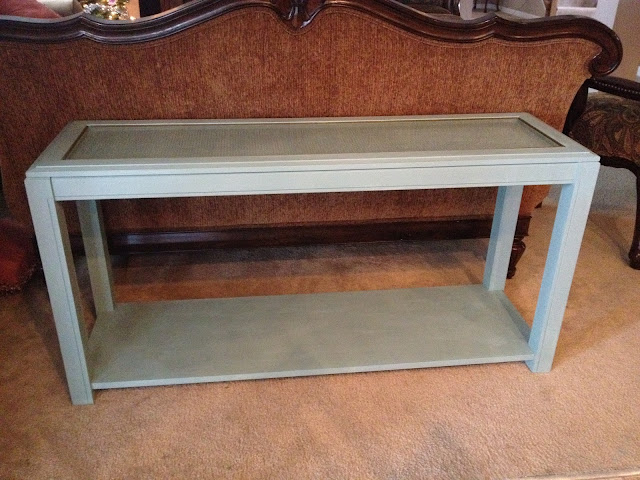
So I instantly knew what I was going to do with the 80's style table that I had snagged off our local freecycle group.

And the ideas started swarming through my head as to what I would put on this table... But first I had to get the table painted. I went right to the computer to find out that this beautiful Colored chalk paint was pretty pricey! About 35.00 for just a quart of paint. Then, they have all the brushes and wax that they recommend you use, as well.

Now, I will hand it to them that the paint does go a long way. And the color is the perfect bluish-green, and can be hard to match (as I found out by experience...or, experimenting). You can probably guess what happened next. I totally tried to make my own version of Duck Egg Blue chalk paint!

I found a recipe online (clicke here) for chalk paint and got a couple colors from my local Farrell Calhoun paint store. Their paint is awesome! It has great coverage and it's now my favorite paint. So I had them match Halcyon Green (from Sherwin Willimas) and another sample site of Enchanted Evening ( Farrell Calhoun color).

The Halcyon green was supposed to be real close to Duck Egg, according to this site (click here). But, I personally found it to be much more yellowish-green. So, I went to mixing the enchanted with halcyon and after my second try was able to get an almost a perfect match!

I did end up using my friends leftover duck egg paint on my piece , because I want to be able to refer back to it in the future when trying to get the exact match. I will post pics of the piece I plan on painting with my own concoction.

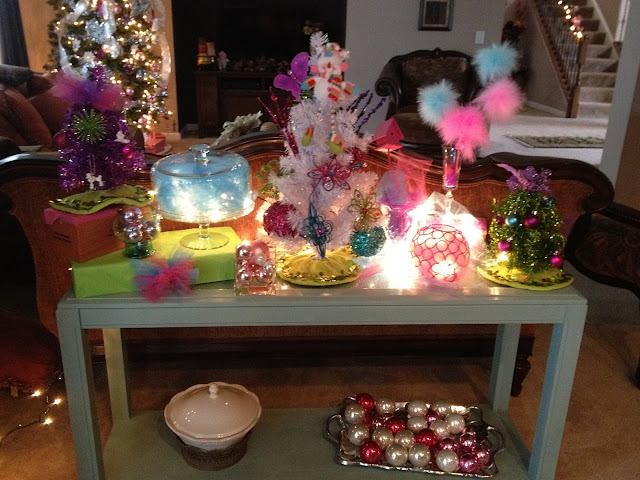
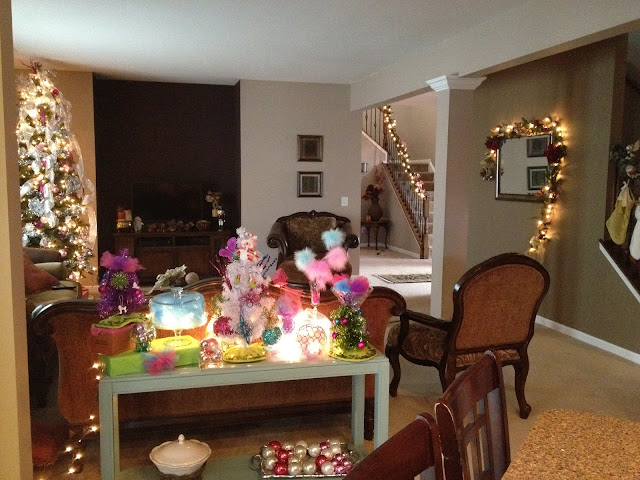
But for now, here is the piece I used the actual duck egg blue chalk paint on. As well as a pictures of the Christmas display that I dreamt up to go along with it.

Saturday, September 1, 2012

I dream of day when all things are organized this way...

At least this is one more thing I can check off my to do list. Making a daily schedule chart. After searching the web for many hours I finally settled on a couple different charts combined together. This is just what I think will work for us.

I wanted to make a chart for their daily responsibilities and then another one for chores that they will earn money for. 


Supplies:
11.5" x 14.5" frame (from our local FREEcycle group)
Laminator or self laminating sheets
Chore cards from here: Confessions of a homeschooler and some from Home School Creations
Double sided tape or glue
2 different sheets of scrap book paper (and some scraps)
Glue dots
Heavy duty magnets

So I did do a little bit of editing to the chore cards to make them fit our needs. I shrunk them down so that each card was about 1" tall , and I changed some the pictures and text out. 

I will be printing out the cards from Confessions of a homeschooler full size for the second chart I will be making later. The second chart will be for chores only with the tickets. As you can see on the daily schedule, there are two chore cards on the chart, one for AM and one for PM chores. So when they get to those they will just look at the chore chart. Both will be stuck to my fridge using heavy duty magnets.

I may be over doing it, but time will tell. Maybe I only need one chart, but for me this made sense.

Instructions:
1.Decorate the back of the picture frame (the Corkboard thingy that holds picture in the frame).

2.Print out your cards and laminate them. Also print out pics of your cuties' faces that are a little smaller in size as the chore cards and laminate them.
(make sure you lay them out in the frame after you put the decorated part back into the frame to make sure you don't waste any laminating pages).

3.Once the frame Is back together you can start sticking the chore cards to the glass with glue dots. This way you can change the schedule easily if you need to.

4.On the back of the frame make sure all metal is either tucked far enough in to protect your fridge , or you can just tape some cardboard over the metal ,like I did.

5. Stick heavy duty magnets to the back of the frame.

Enjoy your new schedule!

Thursday, August 30, 2012

Testing 1,2,3...

Since I am a very busy homeschooling mom, I MUST be able to blog on the go. So I am testing out the blogger app from my iPhone to see how well it posts and how easy it is to upload a picture. Here goes.... First post with a pic. One of my latest creations I did for a baby shower. Well, I say my creation , but I actually saw some like this on pinterest and fell in love with them. Hmmm... Wonder how you post a link using the blogger app?
Anyway, this was so fun to make. I did not follow a tutorial, just saw some photos of something like it, and knew I could have a little fun making this cute little baby!
Made of:
baby wash cloths
Receiving blankets
Sippy cup w/ straw
Ice cream bowl (found at target in the dollar bin)
Cellophane
Hairbows
Ribbon
Card on a skewer
And some fluffy balls from the craft section
Also the big pink cardboard basket was in the dollar bin at target.
To make the bottom of the bucket full I shredded some good ole' paper shopping bags (which the handles always break off of when I try to carry my groceries in them). That's another story...
But I think this turned out so cute! And it was a hit at the party. Maybe not the most expensive gift there, but it was the most crafty one there! And the mommy to be did get a picture holding the gift , so i'd say she appreciated the thoughtfulness and the cuteness of it too!


Welcome to Mandy's Corner!

Well, I am so happy to join the blogging world! After many years of online businesses, and lots of creative ideas running through my head, I have decided to jump on in head first! 

So , for starters, I am going to be posting all things homeschool ( for record keeping purposes). And I may throw in some creative projects that I happen to do along the way, and who knows what else ! =) 

Even if I am the only one to ever read this blog, at least I have a record of what I've been up to for myself! And my darlin' baby girls , who are 4 and 5 and into all things princess at the moment. 

I've heard that you can print your blogs out at the end of the year, so that's not a bad reason to do this either! I'm thinking I will scrap the scrap booking and just go ahead and have a book made of the blog each year instead! 

Time saver?? Maybe...